Friday, October 28, 2011

Tailgate Recipe #8: Smoked Salmon Dip

Let’s kick it up a notch this week with a zesty smoked salmon dip. This isn’t your average tailgate dip, but isn’t that the point sometimes? However, if this isn’t something you'd want to bring to your next tailgate party, file this recipe away for your next house party.


This dip takes the ingredients of the classic smoked salmon bagel sandwich and combines them together to make a rich and flavorful dip.


IMPORTANT: This is for serious salmon lovers only. The smoked salmon has such a rich and delicious flavor, but it is the more dominant ingredient.


This dip is perfect with these mini bagel chips!!

OR—you can serve it up on a toasted, open-face bagel like this.


Either way, if you’re a salmon lover this dip (or spread) is for you!

Cheers!
Christi

Ingredients:


1/4 cup mayonnaise
8 ounces cream cheese
2 tablespoon capers, rinsed and drained
2 tablespoons red onion, diced small
Juice from one lemon
1 teaspoon horseradish
2 ounces plus 2 more ounces thinly sliced smoked salmon, coarsely chopped
1 tablespoon chopped fresh parsley
Bagel chips, for serving

Directions:

In a food processor, combine mayonnaise, cream cheese, capers, red onion, lemon juice, horseradish, and 2 ounces smoked salmon. Process until smooth, about 20 seconds. Transfer to a small bowl and stir in remaining 2 ounces smoked salmon. Top with fresh parsley and serve with bagel chips, or serve it as a sandwich on an open-face toasted bagel.

Recipe adapted from Mrs. Martha

Tuesday, October 25, 2011

Study Snack: Crunchy Granola Bars

MD is in his final semester of school. After we graduated undergrad together, Mitchell began graduate school and is now trying to wrap up his PhD. You could say I’ve gotten accustomed to very late nights of studying, especially during these last few months when he’s been hitting it harder than he ever has before.

While he was studying one evening, I wanted to make him a little snack to keep the pep in his step. What would be better than a crunchy, healthful granola bar?


These were so easy! This is a great base that you can adapt the recipe to however you’d like. Here’s how I made mine:

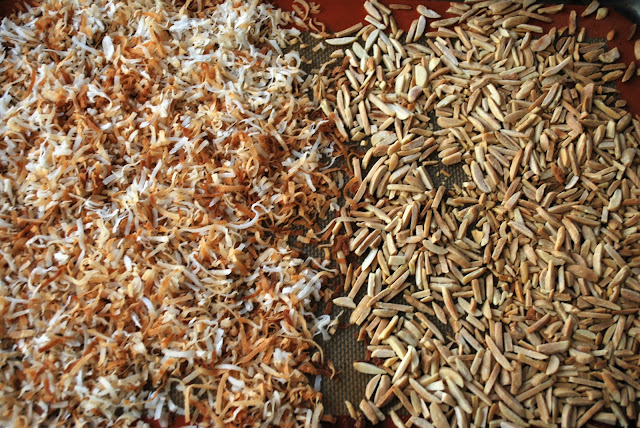
First, toast your coconut flakes and almond slivers. You can totally skip this step, but I don’t suggest that you do. Brown the coconut and almonds on a baking pan and place in the oven at 350 degrees for about 10-15 minutes. 


You must keep an eye on this! One minute the coconut is white, the next minute it’s smoking. Just saying


See why you mustn't skip this step?


Next, combine the butter, flax seeds, cranberries, oats and chocolate chips in a bowl.


Add the sweetened condensed milk.


Keep it coming. Don’t worry about this stuff. It’s good for you to indulge once in a while.


Add the toasted coconut flakes and almond slivers on top.


Beat with a hand mixer until combined. Spread onto a lightly greased baking sheet. My dough was about one inch deep and I left about two-three inches on each side like this:


Look at that gorgeous texture!


Pop the pan in the oven set at 350 degrees. Bake for 20-25 minutes.

Stop right here if you prefer chewy granola bars. Allow the dough to cool and slice into bars with a pizza slicer.

If you prefer a crunchier granola bar like MD and I do, take the pan of granola out of the oven after they've baked for 20-25 minutes. Keep the oven on, but turn the heat down to 200 degrees. Once the temperature has dropped, place the baking sheet back in the oven for about 45 minutes to continue baking. This will allow the remaining moisture to escape to give the bar a crunch!

Remove the baking sheet. Allow to cool for about 5-10 minutes and then slice into bars with a pizza slicer.

Serve these up for the perfect coffee partner, afternoon snack or late night pick-me-up.


MD loved them!


Cheers!
Christi

Ingredients:
3 cups quick-cooking oats
1 (14 ounce) can sweetened condensed milk
2 tablespoons butter, melted
1/3 cup of flax seeds 
1 cup flaked coconut
1 cup sliced almonds
1 cup miniature semisweet chocolate chips
1/2 cup sweetened dried cranberries

Directions:
Preheat oven to 350 degrees F (175 degrees C). Grease a 9x13 inch pan.
In a large bowl, mix together the oats, sweetened condensed milk, butter, coconut, almonds, chocolate chips and cranberries with your hands until well blended. Press flat into the prepared pan.
Bake for 20 to 25 minutes in the preheated oven, depending on how crunchy you want them. Lightly browned just around the edges will give you moist, chewy bars. Let cool for 5 minutes, cut into squares then let cool completely before serving.

Friday, October 21, 2011

Tailgate Recipe #7: Pumpkin Pie Dip!

Remember that time I told you about my near disaster plumbing incident? Well, it almost happened again while I was preparing this pumpkin dessert. But, I learned from my mistake and did not put the pumpkin seeds down the drain. See. That’s what mistakes are all about.

I've been seeing this dessert pop up on Pinterest frequently and really wanted to give it a try. I am so glad I did. It was very quick and easy and it looks so delightful when you’re ready to serve it. Look how easy this would be to take to your next tailgate party!


The rich pumpkin flavor is exactly like what you love in Grandma’s pumpkin pie but this allows you to dip cookies and apples in it! Fun!


I baked homemade Gingersnap cookies the first time I made it. Gingersnaps are easily my favorite holiday cookie! You can find me snacking on these daily from the beginning of November through December. I could swim in molasses.


Here’s the easy and delicious recipe!

Cheers!
Christi


Pumpkin Pie Dip:

Ingredients
1 (8 ounce) package cream cheese, softened
1 1/2 cups powdered sugar (more if you'd like)
1 (15 ounce) can solid pack pumpkin
1 cup whipped cream (I used freshly whipped cream, but the kind you find in the freezer section is just fine, too.)
1 tablespoon ground cinnamon
1 tablespoon pumpkin pie spice


Directions
In a medium bowl, blend cream cheese and powdered sugar until smooth. Gradually mix in the pumpkin. Stir in the cinnamon, pumpkin pie spice, and whipped cream until smooth and well blended. Chill until ready to serve.

Recipe slightly adapted from: All Recipes

Wednesday, October 19, 2011

Wine and Cheese


I am really excited to bring you today’s post as it is featuring two of my favorite things:

Red wine and cheese!

MD and I subscribe to Wine Enthusiast, a magazine that provides the best in wine 101, entertaining and even a little bit about food and travel. Each month it arrives in our mailbox, we quickly pluck it out and flip through the pages to see what wines they are featuring and more importantly, what wines we need to add to our wine cabinet.

In this month’s issue, Wine Enthusiast provided a list of the top 100 affordable wines.

Naturally, I need to do some of my own research. As we read through some of the top wines, I knew I wanted to feature a red wine. That narrowed it down some. Next, I needed to be sure it was a wine that I could easily find in my area. Lastly, I wanted it to be a red wine that I hadn’t tried before.

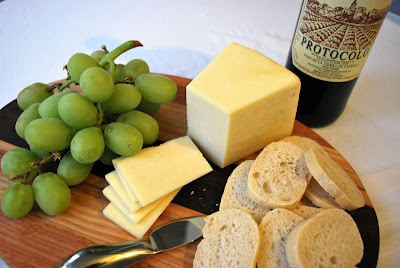
 I decided to go with #2: Dominio de Eguren 2009 Portocolo red wine.


Origin: Spain
Year: 2009
Price: $8

There it is on the cover!

MD and I really, really loved this wine. The taste was very rich and smooth. This wine would be perfect even for someone who doesn’t drink red all that often.


This would also be excellent to serve while hosting. At $8 a bottle, the affordable price allows you to serve a delicious wine without having to spend much at all.

You could serve this with a nice dinner, or simply enjoy it with a scrumptious cheeseboard like we did!


There is no doubt this wine will make a nice pair with most everything. I highly encourage you to go out and pick up a bottle or two soon! With the cold winter months already sneaking up, this will be perfect to keep you and your honey warm.


Let me know when you try it!

Cheers!
Christi

Thursday, October 13, 2011

Copacetic in Carolina

I had the privilege of being featured on one of my favorite blogs today, Copacetic in Carolina!

Ally is a sweet and southern University of Georgia alum who blogs about her life as a newlywed, delicious food, fabulous fashion and so much more. I have very much enjoyed following her blog and I encourage you to check her out! Don’t forget to click her “Follow” button so you can keep up with her!


Click here: Copacetic in Carolina

Tuesday, October 11, 2011

Three Cheers for Three Soups


October is National Vegetarian Awareness Month and while I am certainly not going to preach for you to put down the meat, I would like to share three of my favorite meat-free soups.

As I’ve mentioned before, soup is my favorite meal during the fall and winter months. The three recipes I am featuring below are ones that I’ve made several times in the past. They are the best.

First, I’ll start with Thai Coconut Soup.

I hate to pick favorites, but this may be my favorite soup.

Photo snapped with my iPhone. Dinner at home. December 15, 2010

There is a Thai restaurant in Fayetteville that serves a soup very similar to this recipe. I was so happy to have found a recipe that I can make at home but still taste just like the one from the best Thai restaurant in town.
Here’s where I found my initial inspiration, but I have since changed it quite a bit. 

Ingredients:
4 cups water
1 tablespoon canola oil
1/4 cup thinly sliced shallots
2 teaspoons red curry paste
1 1/2 teaspoons curry powder
1/2 teaspoon ground turmeric
1/2 teaspoon ground coriander
2 garlic cloves, minced
1/2 cup chopped green onions
8-12 white button mushrooms, sliced
6 cups fat-free, less-sodium vegetable broth
2 (13.5-ounce) cans light coconut milk
2 tablespoons sugar
1/4 teaspoon crushed red pepper (or 1/2 tsp. for more kick) 
Lime wedges for garnish

Preparation:
Heat canola oil in pan over medium-high heat. Add shallots and the next 5 ingredients (through garlic) to pan.

Sauté one minute, stirring constantly. Add veggie broth to pan, and bring to a boil. Add coconut milk to pan; reduce heat, and simmer 5 minutes. Add onions, mushrooms and sugar to pan; cook for 2 minutes. Serve with lime wedges.

OPTIONAL: You can add 1 (5 3/4-ounce) package of pad Thai noodles (wide rice stick noodles) to your soup if you prefer. MD loved it with the noodles, but I found it a bit messy to eat.

Next up: Vegetarian Black Bean Chili

Mitchell Darling made this last February for a Super Bowl party we hosted at our house. It was quite a hit. We served the soup in mugs. We have found this to be a much easier way for guests to enjoy sipping soup at a party. Especially when they might be jumping up and down while shouting at a football game.

Served at Super Bowl party hosted at our home. February 6, 2011


Ingredients:
(1) 15-ounce can black beans
1 bunch cilantro, chopped
1 tablespoon cumin seed
1 tablespoon dried oregano
1 tablespoon chili powder
1 teaspoon paprika
1/2 teaspoon cayenne
1 large onion, chopped
1 green bell pepper, diced
2 garlic cloves, minced
4 cups vegetable broth
1-1/2 cups chopped tomatoes
2 cups frozen corn
1/2 teaspoon salt
1/2 cup chopped green onion

Instructions:
In a large skillet, braise the onion in 1/2 cup water for 2 minutes. Stir in the bell pepper, garlic, into a saucepan and simmer with cilantro and herbs and cook until the onion is soft. Add the onion, bell pepper, garlic, cilantro and herbs to a large pot. Add the broth, beans, corn and tomatoes. Simmer 30 minutes or longer if time allows (the flavor improves with longer cooking.) Add salt to taste.

#3: Vegan Cream of Mushroom Soup

This recipe comes to us via Joy the Baker, my most favorite food blogger.

Photo snapped with my iPhone right before I devoured this soup. February 22, 2011

This soup is about as amazing as this one.

Joy calls this her “dream winter soup”. MD and I certainly agree. It is made with cashew milk, which has got to be the dreamiest thing I have ever made, seen, tasted!

The recipe instructs that after you puree the mushrooms, pour the liquid through a fine mesh strainer to leave some of the remains of the mushroom behind. I did not do this. I couldn’t dare think about leaving behind any of this soup.

You’ll totally slurp this one up!

Find her recipe here!

Spoons up!
Christi


Thursday, October 6, 2011

Tailgate Recipe #6: Lettuce Wraps and Fortune Cookies

Not everything you bring to your tailgate party has to be dip and chips or pigs in a blanket. There is nothing wrong with those dishes. In fact, they are mandatory snacks that every party needs. But, with a few chafing dishes or pretty platters you can take your tailgate to another level.

Don’t be scared with this recipe. But, if it’s a little more than you’d like to bring to a tailgate party, it’s totally an anytime dish.

I am featuring Lettuce Wraps and Fortune Cookies.

HISTORY LESSON: Although both lettuce wraps and fortune cookies are most commonly seen on the menus at Chinese restaurant, they are actually traditions that were started in America. Fortune cookies are completely absent in China.

Both are so delicious. I don’t mind that they are made up traditions for American Chinese restaurants.

FORTUNE COOKIES


I started with the fortune cookies. This can be a little tricky. The dough is pretty sticky when it bakes. This is where a Silpat is definitely handy. But if you don’t have a Silpat, you can line your baking pan with parchment paper that has been sprayed with non-stick spray.

Begin by mixing your dough. After this is ready, drop the dough on your baking pan with a tablespoon. Use the back of the spoon to spread out the dough until it's about four inches.


I would recommend that you only do two at a time. You have to work so quickly to shape them while they are hot, doing any more may allow too much cooling time before you’re able to get to additional cookies. They only bake for 7-8 minutes, so it’s not really too time consuming.

After they bake, flip immediately.


Drop in your fortune.


I dropped in cute fortunes relating to the Razorback vs. Auburn game this weekend. You can include whatever themed fortunes depending on when you serve these.

Click on pic to read some of the fortunes.

Fold the cookie in half and pinch the top to seal. Since you are working with such piping hot cookies, it best if you wear latex gloves while you’re molding the cookies. I used the bottom of a spoon to seal them.

Next, bend the cookie over a small dish, like a ramekin, for about 20 seconds.


After that, I placed the two cookies inside the ramekin to continue to shape while the next two cookies baked.


Repeat this process until all dough is used.

IMPORTANT: After each baking process, wipe down your pan with a paper towel. Otherwise, the backs of the cookies will get the remains from previous cookies on them. You want the cookies to be pretty and smooth.


I am serving these fortune cookies in Razorback red Chinese take-out boxes. Too cute.


LETTUCE WRAPS


Woo, now that the cookies are complete we can move on to the lettuce wraps.

These are super easy. After you rinse your lettuce leaves pat dry and set aside.

Brown your meat and/or veggies of choice. You can use lamb, pork, ground beef, or a mixture of veggies. Add in the chopped onion until cooked.

Add in the sauces, stir, stir, stir and voilĂ ! The meal is complete. Let this cool just a bit and pile up on the lettuce leaves.

I am serving this at our tailgate party this weekend. I plan to put the vegetable/meat mixture in a chafing dish with the lettuce leaves placed to the side.


Here’s to a winning weekend!

Cheers,
Christi

FORTUNE COOKIES

Ingredients:
2 egg whites
1/2 cup flour (sifted)
1/2 cup sugar
2 tablespoons water
1 tsp almond extract
1/2 tsp. vanilla extract
Makes about 12 fortune cookies

Directions:
Heat oven to 400F degrees.
1) Place egg whites in a bowl and beat with electric mixer on medium speed until very frothy, almost soft peaks.
2) Add sifted flour,
3) Add sugar, almond, and vanilla then mix.
4) Stir in 2 tablespoons of water to thin batter.
5) Drop dough onto a Silpat baking mat or parchment paper that has been sprayed with non-stick spray.


*After all cookies have set, place them in muffin tins and place back into an oven at 250 degrees. Remove after 15-20 minutes. This will allow any moisture to release so the cookies are crunchy.

LETTUCE WRAPS:

Ingredients:

Green leaf lettuce or butter lettuce leaves
1 pound lean ground beef
1 tablespoon cooking oil
1 large onion, chopped
2 cloves fresh garlic, minced
1 tablespoon soy sauce
1/4 cup hoisin sauce
2 teaspoons minced pickled ginger
1 tablespoon rice wine vinegar
Asian chile pepper sauce (optional)
1 (8 ounce) can water chestnuts, drained and finely chopped
1 bunch green onions, chopped
2 teaspoons Asian (dark) sesame oil

Directions:

Rinse whole lettuce leaves and pat dry, being careful not tear them. Set aside.
In a medium skillet over high heat, brown the ground beef in 1 tablespoon of oil, stirring often and reducing the heat to medium, if necessary. Drain, and set aside to cool. Cook the onion in the same pan, stirring frequently. Add the garlic, soy sauce, hoisin sauce, ginger, vinegar, and chile pepper sauce to the onions, and stir. Stir in chopped water chestnuts, green onions, sesame oil, and cooked beef; continue cooking until the onions just begin to wilt, about 2 minutes.

Arrange lettuce leaves around the outer edge of a large serving platter, and pile meat mixture in the center. To serve, allow each person to spoon a portion of the meat into a lettuce leaf. Wrap the lettuce around the meat like a burrito, and enjoy!


Wednesday, October 5, 2011

October 5th is Do Something Nice Day

Today is "Do Something Nice Day." So in honor of that, here's my virtual act of kindness:

I like ya!


I appreciate you following my blog, trying out the recipes and ideas that I post, and your generous and encouraging comments. 

What I'm saying is, you rock and you make me happy! Duh.

Photo credit JamesonSheppard.com


Love ya major.
Christi