Thursday, September 29, 2011

Tailgate Recipe #5: Red Velvet Whoopie Pies

I've wanted to make whoopie pies for quite some time, but always worried about the cream filling being a bit too much. Although, I’m not a “load-me-up-on-the-icing” kind of gal, I do like a little icing with my cake. I finally decided to give these pretty treats a chance.

I am so glad I did! The filling is a cream cheese base, so it's not too sugary. It's just right.

Red Velvet Whoopie Pies


These silver-dollar sized cookies are so easy and only require a few ingredients and very little time.

To make your batter, all you need is a box of red velvet cake mix, butter and eggs. That’s it!

Side note: You can make these with any cake mix flavor you’d like! Next time, I think I’ll try chocolate with an Oreo cream filling. Yum!

After your batter has been thoroughly mixed, spoon into little balls and drop on a Silpat or greased cooking sheet. Try to drop the dough in 1 1/2" balls so they are uniform in size and stack up nicely.


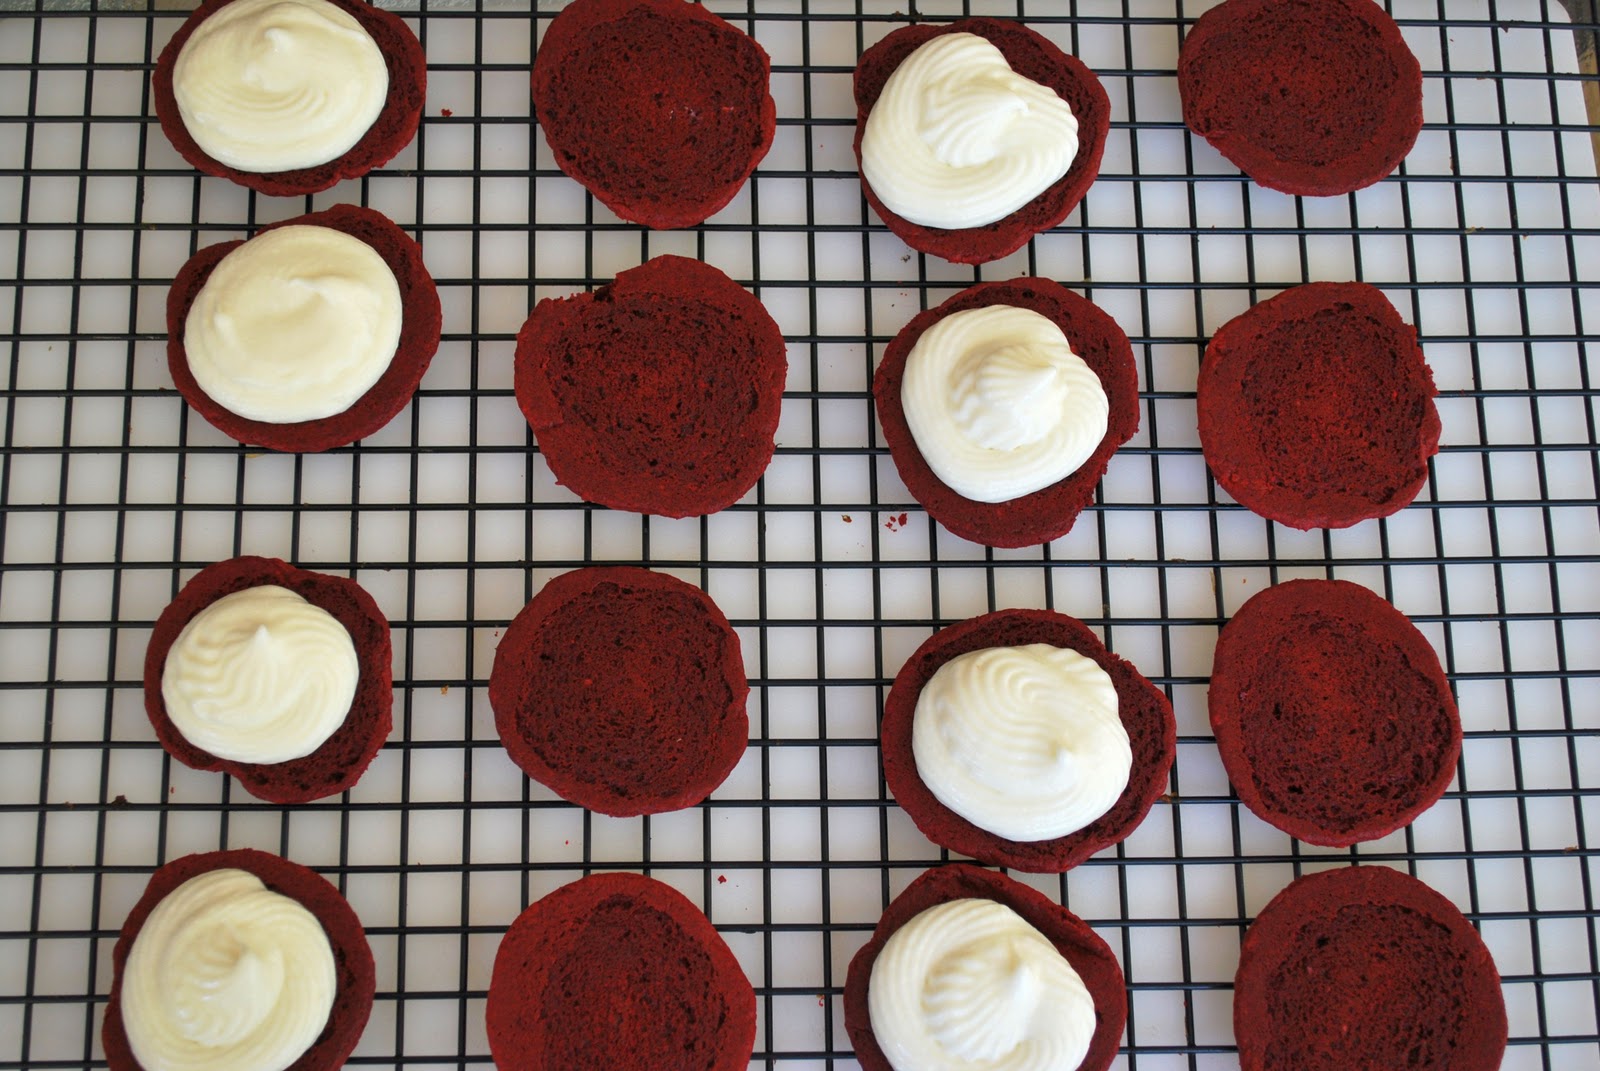
Bake for 10 minutes and place on a cooling rack or plate.


Flip them over and line them up in pairs.

Love the way the top of these cookies crackle.

With an icing bag (or grab a Zip-loc and cut a small section of one corner off), squeeze a small amount of frosting on the flat side of one cookie.


Grab the other cookie without icing and press together to make the perfect whoopie pie.


I served these cookies at our Arkansas vs. Alabama watch party we hosted at our home last Saturday. (Oh, the misery of remembering that game.)


These were a great dessert filling our tummies with taco salad and other snacks.


Why hello, Ben! I see that you are lingering around the table for food. I can't say I blame you.


ENJOY!

Cheers and WPS!
Christi

What you'll need: 


Cookies:

1 Box red velvet cake mix
1 stick of butter
2 Eggs

Preheat oven to 350 degrees.

Mix ingredients until combined.
Drop spoonfuls of cookie batter onto baking sheet about two inches apart.
Bake for 10-12 minutes.
Cool.

Cream Cheese Filling:

1/2 Cup butter, softened to room temperature
1 8 oz. Package cream cheese, softened to room temperature
1 1lb. Box of confectioner’s sugar
1 tsp Vanilla


In a mixer, cream butter, cream cheese and vanilla
Gradually add sugar and mix until smooth
Makes about 24 cookies or 12 cookie sandwiches

Wednesday, September 28, 2011

Sunday Morning Breakfast

Monday was one of my dear friends’ birthday. I am a big fan of celebrating most anything over food. Naturally, I wanted to bring something special to work so my fellow co-workers and I could celebrate her birthday with a warm breakfast.

It wasn’t very hard to decide what I wanted to bring. Em loves anything made with crescent rolls while sipping her Chai tea latte. So, I set out to make mini quiches with a crescent roll crust and Chai tea concentrate.


Before we get started, let me tell you two things about the mini quiches:

#1. IMPORTANT: Don’t fill up the muffin tins with too much of your egg mixture. It puffs up quite a bit. I wasn’t prepared for that. Leave about one inch from the top of your muffin.

#2. How delicious would these be for a morning tailgate treat? Totally delicious.

Let’s start with the Chai tea concentrate:

First, gather your spices. You can find these beautiful babies from most organic grocers, like Whole Foods or Fresh Market. I purchased mine from our local Co-op.


Bring the water to a boil. Add the spices and tea, remove from heat and let steep 20 minutes. Strain into a large bowl.


Add the brown sugar, honey, and vanilla. Stir, stir, stir to combine.

To make your latte, mix 1 part concentrate (or more for stronger flavor) with 1 part milk or soy milk. You can heat enjoy it warm, or serve over ice for a chilly treat.

For a stronger flavor, mix 2 parts concentrate with 1 part milk.


Sip, sip, sip.


QUICHE:


A perfect partner for your Chai tea are these flaky mini quiche.

Start with two cans of crescent roll dough. Form one can at a time in a rectangle shape and roll with a rolling pin to make one sheet of dough. Slice the dough twice vertically and three times horizontally to make a six squares per can. Repeat with second can of crescent roll dough.

Place these into greased and floured muffin tins. They tend to stick, so grease and flour liberally. Form them to make a cup shape like a cupcake paper.

Simply whisk the eggs with your choice of veggies, and pour into the dough cups you placed in the muffin tins leaving about an inch of space from the top.

Bake for about 20 minutes on 375 degrees.

Pick the little quiche up and eat it with your hands or a fork and knife if anyone is watching.


Cheers!
Christi

CHAI TEA

Ingredients:
4-½ cups Water
1 stick Cinnamon
1 piece Fresh Ginger Chopped
7 whole Cardamom Pods
2 whole Star Anise Pods
10 whole Cloves
¼ teaspoons Freshly Ground Black Pepper
½ teaspoons Freshly-ground Nutmeg
1 teaspoon orange zest
10 tea bags
⅔ cups brown sugar
1 Tablespoon honey
1 Tablespoon vanilla

Directions:
Bring the water to a boil. Add the spices and tea, remove from heat and let steep 20 minutes. Strain and add the brown sugar, honey, and vanilla. Stir to combine.

Mix 1 part concentrate with 1 part milk, heat and enjoy or pour over ice. For a stronger flavor, mix 2 parts concentrate with 1 part milk.

Source.

MINI QUICHES:

Ingredients:
2 cans Crescent dough
1/2 cup parmesan cheese, shredded
1/2 cup cheddar cheese, shredded *You can use any type of cheese you want. Just have it equal around one cup of cheese.
3 tablespoons fresh chives, chopped
2 Roma tomatoes, diced
6 eggs
2 tablespoons cup cream (optional)
Salt and pepper

Directions:

Preheat oven to 375 degrees F. Grease and flour a muffin tin. Roll out croissant dough and cut a dozen 4″ squares. Press dough into 8 muffin cups. Ina large bowl, whisk the eggs, shredded cheese, tomatoes, herbs and salt and pepper.

Bake cups at 375 degrees F for 15-20 minutes. Remove from oven and allow sitting for 5 minutes to finish cooking.

Eat and enjoy.

Thursday, September 22, 2011

Tailgate Recipe #4: S'more Cookies

I can’t ever make up my mind on whether or not s’mores are a summer or fall/winter treat. I want them in the summer after I’ve been out in the pool all day. But, I want them in the fall and winter while I’m warming up by a campfire.

I’ve at least decided it’s not a springtime treat. Can’t it be a summer, fall and winter sweet treat?

Yes? Well, I think so too!

Last week, like any other typical Saturday morning, I spent it rushing around the house getting ready for an exciting Razorback game. Unfortunately, the weather was quite different than the previous two games. It was a little chilly and very rainy.

This is where s’mores come in as a fall treat.

Wait. S’mores at a tailgate party? Bad idea. Let’s try S’more Cookies!


This recipe takes all of the important ingredients of an original s’more, stacks it up nicely and bakes to a perfect, easy-to-pick-up, square-shaped cookie.

In a blender, mix the butter and sugars until it becomes a fluffy mixture. Add the eggs and vanilla next and mix until combined.

Add flour, baking soda, salt and cinnamon and combine.

Stir in the chocolate chips and marshmallows.


Line your graham crackers side by side on the pans so they touch. You can add or remove the crackers according to how much dough you have.

Place the dough in the center of each graham cracker square. I used about 1 ½ tablespoons per cracker.  Press down slightly with your fingers or the back of a spoon.


Bake for 5 minutes, then remove from oven to press chocolate bar pieces on to the top.


Bake for 5 – 7 more minutes or until dough is beginning to turn golden brown at the edges. Once the cookies have cooled, slice with a pizza cutter close to where the perforated marks would be.


Take these to your next tailgate party; especially if it’s a chilly and rainy day!

Cheers!
Christi


Ingredients:
11 Tablespoons unsalted butter, softened
1 cup brown sugar, packed
½ cup granulated sugar
2 large eggs
1 teaspoon vanilla
1 teaspoon baking soda
½ teaspoon sea salt
1 teaspoon cinnamon (optional)
2 ½ cups flour
3/4 cup semi-sweet chocolate chips
½ cup mini marshmallows
3 regular sized Hershey’s bars, broken into pieces
1-2 packages graham crackers, broken into squares

Directions:
Preheat the oven to 375 degrees. Line baking pans with a Silpat or parchment paper. 

Lay out graham crackers side by side so they are touching. You may have to add or remove graham crackers according to how much dough you have.

In the bowl of an electric mixer, cream butter with white and brown sugar until light and fluffy. Add the eggs and vanilla and mix until combined.

Add the soda, salt, cinnamon and flout to the butter mixer and combine on low speed.

Fold in the chocolate chips and marshmallows.


Place tablespoons of dough on graham crackers about 1 – 1 ½ inches apart. Press down slightly with fingertips.


Bake for 5 minutes then remove from oven to press chocolate bar pieces on to the top.


Bake for 5 – 7 more minutes or until dough is beginning to turn golden brown at the edges. Once the cookies have cooled, slice with a pizza cutter close to where the perforated marks would be.

Wednesday, September 21, 2011

Three Easy Hors d'oeuvres

Now that I’ve given you the deets on how to make super cute coasters, let me give you some ideas on what to snack on while crafting.

We enjoyed fondue with salami and French bread, crispy asparagus sticks and chocolate croissants.

Easy Hors d'oeuvre idea #1: Fondue


This was my first time to make fondue. I’ve had my fondue maker for two years now and haven't used it. What have I been thinking? It was so easy and so delicious, I will certainly be making this again very soon.

I poured in the white wine and let it simmer before adding the rest of the ingredients. When it all came together in a beautiful harmony, I turned down the heat and set it aside.

There she is on the left!


I had a platter of diced French bread and fresh salami ready to be dipped in the gooey fondue.

Easy Hors d'oeuvre idea #2: Crispy Asparagus Sticks


I was really excited to make these asparagus sticks. I’ve wanted to make them for awhile, but just haven’t had the right occasion.

After you snip the ends of the asparagus off, dip them in a beaten egg and coat in the Panko mixture.

Place on a wire rack and bake!


These were even better than I expected, even though I baked them for a little too long. I used pencil asparagus and they baked a little quicker than I was expecting. Next time I want them to be a little crunchier so I’ll take them out just as the breading gets brown.


This would make for a terrific side dish to almost any meal!

Easy Hors d'oeuvre idea #3: Chocolate Croissants


Here’s a scrumptious dessert that is so, so delicious and something you can prep ahead of time. Score! Although, even without prepping ahead of time, it’s so simple.

You simply begin with puff pastry that you will find in the freezer section.


Cut each sheet into eight triangles.


Drop two squares of milk chocolate in each triangle.


And roll!


STOP: Here’s where you can wrap these little nuggets up and store them overnight.  Place them in the refrigerator and bake within 24-36 hours.


Right before I placed them in the oven to bake, I applied an egg wash to the tops to make them golden brown.

Here they are!


These croissants are so delicious. They are flaky, buttery, decadent and will honestly make you think you're on the sidewalks of Paris.  

Enjoy, my friends!
Christi


FONDUE:

Ingredients:
1 cup dry white wine
1/2 pound shredded Swiss cheese
1/2 pound shredded Gruyere cheese
2 tablespoons all-purpose flour
1/4 teaspoon salt
1/4 teaspoon ground nutmeg
1 loaf French bread, cut into 1 inch cubes

Directions:
Simmer wine in fondue pot. Add Swiss cheese, Gruyere cheese, 1/4 pound at a time. Stir after each addition of cheese until melted. Stir in flour. When all the cheese has melted, stir in salt and nutmeg. Serve with cut-up French bread. 


CRISPY ASPARAGUS STICKS:

Ingredients:
1 bunch of asparagus (mine had about 30 spears)

2 egg whites
1/4 cup flour 
1 cup seasoned panko crumbs
1/4 cup parmesan cheese
salt and pepper

Directions:
Preheat oven to 425 degrees. Lay a wire rack on a baking sheet and coat with non-stick spray.

Snap off the tough ends of each asparagus spear. On two separate plates, add the eggs whites (lightly beaten) and the panko + flour + cheese. Season the panko mixture with salt and pepper if desires. Coat each asparagus spear in egg whites, then lay in the panko mixture and thoroughly cover. If the panko won’t stick, dip back in the egg whites and roll in panko once again. Lay each spear on the wire rack.

Bake at 425 degrees for 15 minutes, or until golden brown and crispy


CHOCOLATE CROISSANTS:

Ingredients:
1 box frozen puff pastry, thawed
2-3 bars of milk chocolate, broken into squares
1 egg
1 tablespoon water
sugar

Directions:
After the two sheets of puff pastry have thawed, cut into eight triangles. Place two bars of chocolate into each triangle and wrap into bundles. 

Place on baking sheet that has been sprayed with non-stick spray.

Beat one egg and add water. Baste the egg wash over each bundle and sprinkle with sugar.

Bake at 350 degrees for about 15 minutes, or until golden brown.


Sources:

Tuesday, September 20, 2011

Do-It-Yourself Project #2: Coasters

Last week, I invited a few of my closest friends over for a fondue and DIY coaster party. We enjoyed appetizers, bubbly and each other’s company all while making neat little coasters. I suppose I should say, we had so much “fonduing” it!

QUICK NOTE: Come back tomorrow for the recipes to these tasty treats pictured above!

It’s the perfect craft to enjoy with friends all while catching up on the latest news.

I set up the working station before the girls arrived. I covered a table with a vinyl table cloth so we could get messy and not worry about it. I laid out all the supplies needed: tiles, paper, felt, Mod Podge, spray acrylic, hot glue gun and sponge brushes for each of us.


After plenty of snacking and sipping, we got to work!


We had a lot of fun selecting which paper to choose. Some of the girls even added photos on their coasters. To do this, you must print your photos on regular copy paper. Otherwise, the Mod Podge will strip the ink from photo paper.


The project is really quite simple. I picked up the tiles from Lowe’s for $.16 each. The paper, Mod Podge, felt, spray acrylic and sponge brushes all came from Hobby Lobby. It’s an affordable way to add some extra fun to your dinner party.


A little closer:


I suppose this makes me two for two on DIY projects. Success!

Go get crafty, y’all!
Christi


What you’ll need:

From a home improvement store, like Lowe’s:
Square ceramic tiles. Mine were 16 cents each and about 4” x 4”. Mine were glossy tiles. It really doesn’t matter what kind you use.)

From a craft store like Hobby Lobby or Michael’s:
Mod Podge
Paper of your choice. You can use anything from scrapbook paper, special cardstock, old invitations, or photos printed on copy paper.
Foam brushes
Felt for backing coasters
Glossy acrylic sealer spray
Hot glue gun

HOW TO:

1. Cut your paper into squares 1/8” - 1/4″ smaller than your tile. Stack these up and place in your work station.

2. Brush the tile Mod Podge glue. Use a generous coat and work quickly. This stuff dries quickly! Once you place your paper, there’s no turning back.

3. Press the paper to the tile starting in the middle and work to the edges to eliminate air bubbles. Add extra glue to the edges if it’s needs a little more to stick to.

4. After about 10 minutes, apply a layer of decoupage glue to the top of the paper. Allow this layer to dry 15 minutes and repeat 2-3 times.

7. After 10 minutes of drying, spray the acrylic sealant. You should probably take this part outside. The sealant is rather strong.

8. Lastly, when the coasters are completely dried, glue the felt square to the back of your coasters.

*Wait at least one day before using the coasters to ensure they are completely dry.

Thursday, September 15, 2011

Week Three Tailgate Recipe: Pretzel Bites

I am really excited to tell you about this week’s tailgate recipe. It gives you the option of both sweet and savory. The bite-sized morsels will be perfect to take with you to Saturday’s football game.

Pretzel bites that are baked, not fried!


These pretzel bites are made from frozen dough that you can find in the freezer section. It is one of my favorite ingredients to use. It’s nice to skip the big step of making dough, but still getting the same home-made taste. By the way, you can make the most amazing cinnamon rolls with this cheating way, too.

I already had a package of the frozen loaves in my freezer, so I set out two loaf in bread pans that I sprayed with non-stick spray. Cover that with plastic wrap and let it rise for about 12 hours. 

When the dough has risen, remove from pans and roll out onto a sheet of floured parchment paper. Roll out the dough until it’s about ½ inch deep.

Next, take a pastry or pizza cutter and slice into 1 inch squares, like this.


You’ll see that mine aren’t perfect at all. They don’t need to be. But, I’ll blame this on MD. He did the cutting in this batch.

NOTE:
I am making these again this Saturday. I am going to try to cut them in more uniform squares and roll them into balls. I am also going to try using the frozen rolls instead of the frozen loaves. I’ll let you know how it goes.


After all the dough has been cut, let the bites rise for about 30 minutes. They will double in size.

Once the dough is ready, bring a pot of warm water to a gentle boil. Begin dropping in ten pieces of the dough at a time. Boil for one minute and remove to a paper towel. Repeat until all dough has been boiled.

They will puff up a little like this:


Place on a baking sheet that has been sprayed with non-stick spray and bake at 375 degrees for 20 minutes or until the tops just start to get crispy.

Let them cool for about 5 minutes.

Bring them together and baste with butter.


I divided mine in half to coat half of the pretzel bites in a sweet cinnamon sugar and the remaining half in a savory garlic Parmesan.

Sprinkle the soon-to-be savory bites with kosher salt. Next, toss them in a bowl with shredded parmesan and garlic powder until fully coated. Set aside to cool on parchment paper.

Take the other half of your buttered pretzel bites and toss them in a bowl with cinnamon sugar until fully coated.


Since we've coated these in butter, store them in the refrigerator if you don't eat them right away. Give 'em a quick re-heat in the oven before serving. If you're bringing them to a tailgate party, they are just as scrumptious served room temperature. I'd probably make these the morning of though. 

Share with other football fans around you and enjoy!

Cheers!
Christi
WPS


Shout out: I got these cute bowls from The Container Store. I think I will live there.

Ingredients:
2 loaves Rhodes frozen dough or 12 Rhodes roll dough, thawed and cut into 1 inch squares
4 tablespoons butter, more if needed
Kosher salt
1 teaspoon garlic powder
1 cup grated Parmesan
About a half cup cinnamon and sugar mix